Do-it-yourself growing microgreens questions answered!

Do-it-yourself growing microgreens questions answered!

What are microgreens?

Before we talk about how to grow microgreens, let’s talk about what microgreens are. There’s still a lot of confusion about what microgreens actually are and how they differ from sprouts and mature plants.

First off, microgreens are simply baby plants. They’re not different species and they’re not necessarily grown differently from the plants in your garden...they’re just harvested sooner.

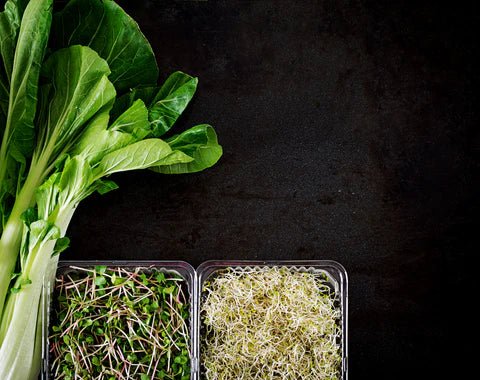
While sprouts are seeds that have sprouted a little but have not begun to photosynthesize, and adult plants have been allowed to grow until maturity, microgreens are somewhere in the middle. Microgreens have begun to photosynthesize, so they have vibrant colors and flavors. However, they’re still small plants so their nutrients haven’t spread out and become diluted as in adult plants.

Sprouts carry a high risk of bacterial contamination due to the way they’re grown, and adult vegetables often require months of growth until they can be harvested. Microgreens, on the other hand, pose a very low risk of contamination and can be harvested in only a couple weeks! Check out our June blog for more on why you should make the switch to microgreens.

From left to right: adult plant (bok choy), microgreens, sprouts

How to grow microgreens

Now you’re convinced to start growing microgreens! There are a ton of good ways to grow microgreens, but we’re going to share our tried-and-true hydroponic method using our favorite microgreen–broccoli–as an example.

A tray of healthy broccoli microgreens right before harvest

What you need to grow microgreens

  • Seeds (keep in the fridge or a sealed container until you’re ready to sow, because this extends the seed’s shelf life...they can stay viable for up to five years for some varieties!)
  • Some type of clean growing containers 
  • A spray bottle 
  • Fresh, pH balanced water (tap water is usually fine)
  • Pad substrates–a substrate is the growing medium, or the thing the seeds are grown on. 
    • Pads and soil are both potential substrates
  • A medium-sized bowl to soak substrate pads

10" X 20" trays, jute pads, a bowl, a mister, and seeds

How to grow microgreens

  1. Make sure your trays are scrubbed clean and free of debris or soil. Place one 10 X 20 (or 2, 10 x 10) trays within one 10 X 20 tray
  2. Submerge two substrate pads (one for each 10 X 10 tray) in water until they’re soaked through, then gently wring out the pad so that it’s not dripping
  3. Flatten the pads in the square trays
  4. Scatter your seeds as evenly as possible on the substrate
  5. For reference, we use ½ ounce of broccoli seeds for a 10 X 20 grow tray
    1. Mist the seeds thoroughly; the water activates the growing process
    2. Cover the trays so that the seeds are in complete darkness, and keep them in darkness for two-three full days (by the way, different seeds need different ‘blackout’ times, but we’re using broccoli in this example)
    3. While the seeds are in blackout, make sure to mist them thoroughly once a day so that the seeds never get dry
      1. After two-three days of darkness, uncover the seeds and place them in a sunny south-facing window, or position a grow light 10-12 inches above them
      2. Now that they’re uncovered, start watering them from the bottom! Pour enough water in the bottom tray to keep the substrate moist 
      3. The bigger the greens get, the more water they want. On average, add about 1 cup per day
        1. After about 12 days, harvest the microgreens with a clean pair of scissors by cutting them about 1 inch above the substrate
        2. Stick them in the fridge or freezer (They prefer to be stored in glass) and mix into anything from humus and salads, to smoothies and fruit salads!

        A seeded tray ready for a couple days of darkness (they think they’re under soil!)

        Tips and tricks for growing microgreens

        The number one problem that people ask us about is that their microgreens simply don’t seem to be germinating, or beginning to grow. The reason for this problem is almost always underwatering. If this is true for you, try misting them a bit more and see if that convinces your seeds to germinate.

        If you’re not seeing any growth but you don’t think you’ve overwatered your seeds, maybe you’re trying to grow something that simply has a very long germination time! For example, carrot microgreens can take a week to germinate!

        As a rule, very large or sturdy seeds should be pre-soaked overnight (like sunflower and pea shoots). Make sure to rinse your soaked seeds before planting them in soil or placing them on your hydroponic mat.

        On the other hand, some seeds have a coating that gets gelatinous when they’re soaked. Don’t pre-soak tiny seeds like chia, basil, cress, arugula, or mustard. In fact, don’t soak super-tiny seeds at all because they become hard to spread evenly. Be patient. Most people have it down by their 3rd or 4th attempt. 

        If you want to get creative and branch out with lots of different microgreens, check out this amazing guide on growth times and substrates for over 30 types of plants!

        List of microgreens

        ...and useful growing tips!

        1. Broccoli: easy to grow and full of micronutrients and health-boosting compounds
        2. Mesclun: this is actually a mix of greens and great for growing a variety all at once
        3. Collards: these like to be grown hydroponically–without soil–and have a nice deep green color
        4. Mustard: easy to grow with a strong, spicy mustard flavor
        5. Radish: can grow in warm or cool places and germinate fast. Great for growing hydroponically
        6. Arugula: sharp tasting microgreens that can be harvested in as little as 5 days
        7. Cress: easy to grow in soil, hydroponically, or even on a paper towel!
        8. Pea shoots: the seeds should be pre-soaked in cold water for about a day. The microgreens are long and crunchy, great for salads
        9. Sunflower: these need to be pre-soaked for at least half a day, but the microgreens are big, crunchy and worth the wait!
        10. Kohlrabi: these are easy and fast to grow and have pretty lavender stems with a mild cabbage flavor
        11. Amaranth: these are easy to grow and last in the fridge for longer than most microgreens. They have a bright red color and a spinach-like flavor
        12. Buckwheat: these big, angular seeds should be soaked for at least half a day
        13. Carrots: carrot microgreens take a relatively long time to grow for a microgreen (4-5 weeks!), but the greens have a nice carroty flavor!
        14. Basil: a fast-growing microgreen that prefers warmer conditions. Try growing it in summer outside or near a window
        15. Sorrel: this is a slightly slower-growing microgreen and can take up to 20 days to grow. However it has a lemony flair that’s a great addition to fruit salads
        16. Wheatgrass: nutritious and grassy-tasting
        17. Alfalfa: easy to grow and likes to be grown hydroponically. It has a mild flavor that’s good for a little crunch in salads and sandwiches
        18. Beet: Beet seeds need to be pre-soaked overnight and like soil. The microgreens are bright red!
        19. Kale: likes to be grown hydroponically and has a somewhat milder flavor than its adult counterpart
        20. Clover: grow fast and prefer to be grown hydroponically. They have a very fresh flavor that’s great as a garnish on heavier dishes

        What is microgreens farming?

        We all know that microgreens are more than just a fancy garnish, they’re amazing for our health and an incredibly versatile ingredient for many dishes!

        Now that it’s summer, you might be busy harvesting your veggies for the season. Or maybe you waited too long and missed your chance to plant! Well, don’t worry...microgreens are easy and fast to grow, and they can be grown inside year-round.

        While mature broccoli grown from seed takes about 100-150 days to harvest, broccoli microgreens grown from seed can be harvested in 12-14 days and contain more micronutrients and cancer-fighting sulforaphane than adult broccoli!

        Microgreens benefits: why grow your own microgreens?

        We know that microgreens have high amounts of health-boosting micronutrients and vitamins. We also know that growing microgreens can contribute to a more sustainable food system. But if their excellent nutritional and environmental perks haven’t convinced you to start growing microgreens, consider this:

        Microgreens can give you more control over your food. You can grow them yourself, year-round, in a matter of days

        They’re easy to grow even if you have no gardening or farming experience. They’re a great way to start learning about growing plants

        • Kids love growing (and eating!) microgreens
        • It gives you a direct connection to your food, instead of simply buying food at a grocery store
        • Growing microgreens is way less expensive than buying them at the store...for $5 you can grow 10-15X more microgreens than you could buy at the store!

        How long do microgreens take to grow?

        Many plants can be grown as microgreens, and all of these varieties have their own little differences in growth process and time. So how long do microgreens actually take to grow?

        Here at Beyond Microgreens, we’re obsessed with broccoli microgreens! This versatile baby vegetable takes about 12 to 14 days from seed to harvest–and that’s a fairly average grow time. Most microgreens take, on average, 12 days from seed to harvest...compare that to the ~60 days that most vegetables take from seed to harvest.

        That means that not only can you be eating your healthy superfood microgreens sooner, you can actually grow more crops than you could with traditional vegetables!

        Easy microgreen growing kits 

        Have we convinced you to consider growing microgreens? If not, maybe you’re still intimidated by the thought of farming, or you think you don’t have a green thumb. Don’t worry! 

        Very little equipment is needed for growing microgreens, and harvesting is a breeze. Even better, there are easy microgreens kits available that make the process even simpler and faster.

        Of course, you can always get your greens easily by adding our Broccoli Booster to your next smoothie or salad. Broccoli Booster is 100% Colorado-grown organic microgreens. These pure, freeze-dried broccoli microgreens are a powerful and potent way to get more Nrf2-activating sulforaphane into your diet!

        Dr. Abrar B

        Learn More

        Pediatric physician with five years of experience in neonatology, NICU, PICU, and emergency care. Skilled in intubations and managing critical situations. As a medical author for BeMicro, focuses on nutrition for all ages, integrating evidence-based practices to improve overall health and well-being.

        Back to blog